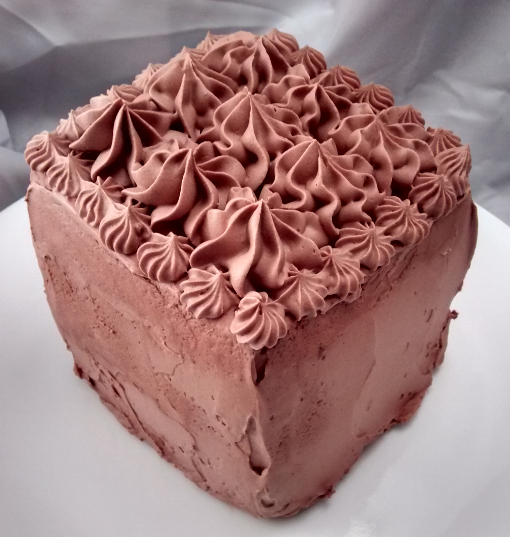
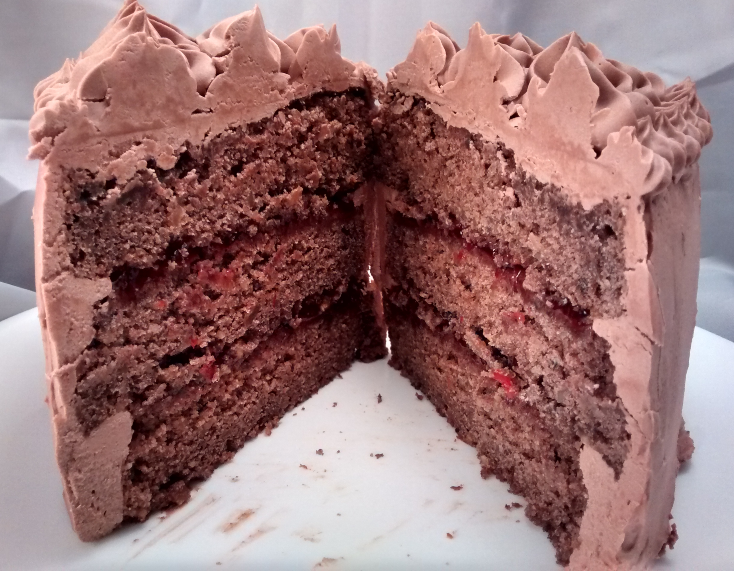
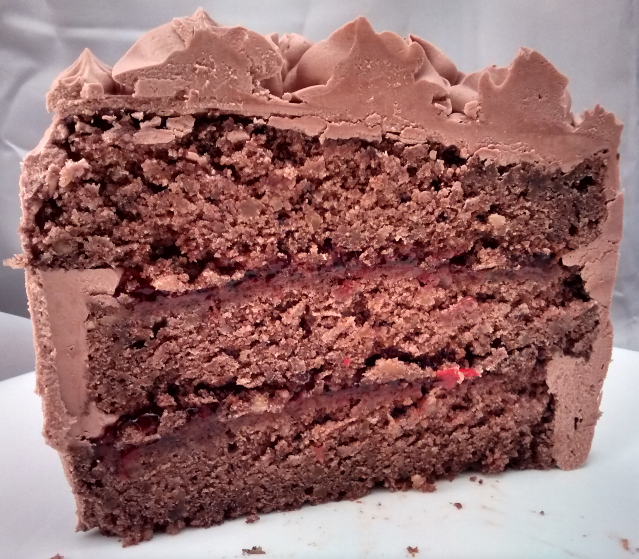
Here’s a cake with the potential for igniting romance. Combining the flavors of cocoa, cherry and hazelnut, this tall, semi-sweet cake is a perfect shared dessert after a dinner for two. (The butttercream could even make a nest for an engagement ring—just don’t blame the cake if it ends in divorce.)
If you don’t have any experience in cake making, you probably won’t want to start with this recipe: This is not an “everyday” cake. It is a labor-intensive project for special occasions. It’s great for Valentine’s Day, but remember that you need to begin work on it two days before you serve it. So if you want to serve it next Valentines’ Day, start working on February 12th. This recipe will make three cakes-for-two. The cake can be frozen.
- 2 cups (226 grams) coarsely-chopped hazelnuts
- 2 sticks (.5 pound) of unsalted butter
- .5 cup (40 grams) Dutch-processed cocoa (I use Droste.)
- 2 cups (224 grams) cake flour, sifted
- 2 cups (384 grams) granulated sugar
- 2.5 teaspoon baking powder
- .5 teaspoon baking soda
- .5 teaspoon kosher salt (or 1 teaspoon table salt)
- 2 cups buttermilk, at room temperature
- 1 Tablespoon kirsch
- 2 large eggs, at room temperature
Heat your oven to 325 degrees Fahrenheit. Grease or spray a 12”x12” square baking pan. Set it aside.
Spread the hazelnuts on a baking sheet and toast them in the oven. Keep checking them every few minutes to make sure they do not burn. The amount of time necessary to toast the nuts depends on how finely they were chopped. When toasted, remove from the oven and put on a rack to cool. Turn your oven up to 350 degrees Fahrenheit.
In a sturdy saucepan, over medium-high heat, cook the butter to the beurre noisette stage. Set it aside to begin cooling.
In a mixing bowl, combine the cocoa, sifted cake flour, sugar, baking soda and salt. Using a hand whisk or fork, stir until throughly mixed.
Using a food processor, pulse the cooled hazelnuts until finely chopped, but do not allow them turn turn into a nut butter. Set aside.
When the beurre noisette is warm, but no longer hot, add it to the flour mixing bowl. Stir until the dry ingredients are saturated with the beurre noisette.
Add the buttermilk, kirsch and eggs. Using an electric hand mixer, beat until the batter contains no lumps. Fold the hazelnuts into the batter.
Pour the batter into the baking pan, rap it on a hard surface a few times to remove any air bubbles and bake it in a 350 degree Fahrenheit oven for approximately 27 to 31 minutes. The cake is baked when a toothpick inserted in the center comes out clean and the sides of the cake are beginning to pull away from the sides of the baking pan.
Remove the cake from the oven and cool it in the pan on a cooling rack for 10 minutes, then very carefully move the cake from the pan to the cooling rack. (Choose a cooling rack that is sturdy and allows you to cut a delicate cake on. I use a large metal rack with a smaller grating where the bars create openings of 1.5 centimeters.) Cool the cake to room temperature.
Use a sharp knife to mark the four sides of the cake. Each side needs to be divided into thirds. Using a sharp, thin and long knife, and the guides you just marked, cut the cake into nine squares of equal size. Clean the knife between cuts. This is a delicate cake that is difficult to cut, so work slowly and carefully. Clean up any large crumbs and use a spatula to transfer the cut layers to a baking sheet lined with parchment paper. Place the cakes in a single layer; use an additional baking sheet if necessary.
Freeze the cake until the outsides are firm, at least an hour, then cover loosely with foil wrap and freeze overnight.
To finish the cakes, start by making Semi-Sweet Chocolate and Kirsch Italian Buttercream Frosting.
Semi-Sweet Chocolate and Kirsch Italian Buttercream Frosting
- 12 ounces of semi-sweet chocolate
- whites from 5 large eggs, at room temperature
- .25 teaspoon cream of tartar
- .25 cup water
- 1.25 cups (240 grams) sugar, divided
- 1 pound (4 sticks) unsalted butter, softened at room temperature
- 1 Tablespoon kirsch
In a double boiler, melt the chocolate. (You could also use a microwave to do this.) Set it aside in an area warm enough so that it will not solidify.
Fit your stand mixer with the whisk attachment. Add the egg whites to the bowl and whip on high speed until bubbly. Add the cream of tartar and continue whipping until soft peaks form. Add .25 cup (48 grams) of the sugar to the bowl and continue whipping until firm peaks form. Turn the mixer off.
In a sturdy saucepan combine the water and remaining cup (192 grams) of sugar. Place it over high heat and monitor with a candy thermometer. Cook until the mixture reaches 244 degrees Fahrenheit.
Turn the mixer to high and slowly add the sugar syrup to the whipped egg whites. (If you cannot do this with the mixer on, turn the mixer off to add a small amount of syrup, then turn the mixer on to incorporate. Repeat until all of the syrup is in the eggs.)
Continue whipping the eggs and sugar until the outside of the bowl has cooled down. With the mixer still on, add the butter, one tablespoon at a time. Be sure each tablespoon of butter is fully incorporated before you introduce the next. When all of the butter is incorporated, you may find that your frosting is too “soupy”. This usually means that the eggs were too warm when you began adding butter. Just continue to beat it; it should firm up. Add the kirsch and whip to incorporate.
By this time the semi-sweet chocolate should be warm, but not hot. Add it a bit at a time to the buttercream, continuing to whip until all of the chocolate is incorporated. Be sure to scrape the bottom and sides to check for any unmixed frosting. When the chocolate is incorporated, switch to the paddle attachment and stir the frosting on lowest speed for five minutes. This will deflate the frosting and make it easier to spread.
Cake Filling
- 12 ounce can Solo Cherry Cake & Pastry Filling
Keep each of your cake layers in the freezer until needed for assembly. Place one square on a flat work surface. Cover the top with some Solo cake filling and place another square on top. Cover that layer with filling and place another layer on top.
Carefully frost the sides and top of your cake. Keeping a finger on the top of the cake while you seal the sides with frosting will help to keep the cake together. Once frosted, slide a spatula under the cake and transfer it to a holding tray.
Repeat for the two remaining cakes.
Decorate your cakes using the remaining frosting and any additional decoration you desire.
Allow the cakes to sit at room temperature for about two hours to begin the thawing process. Then transfer to the refrigerator for another 24 hours to complete thawing. Before serving, allow your cake to warm at room temperature for at least two hours.


